Yes, I took a course in Photoshop (Yes, I earned an 'A') but college level courses only teach you the basic's. All I have obtained as far as skills since my course I have taught myself by following tutorial's only to build on my basic skills I learnt in class I took about 3 years ago. So with that said I want to be able to be one of those Web/Graphic Designers to give back to newbies just coming into the industry.
So this week I wanted to do a tutorial on an 3-D Globe Image. I think it is pretty cool and relatively easy to do.
Let's go ahead and get into it.
Open up Photoshop and CTL-N to create an new document. I used width as 2560 pixels by height as 1440 pixels. You can make it whatever you want.
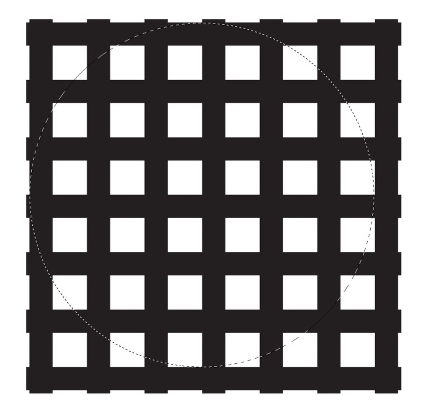
With the Rectangle Tool create a rectangle, then just start duplicating it until you get about 7 columns. Use the Distribute Horizontal to make the distances all the same between them. After that select the first layer of rectangles and holding shift click the last layer of rectangles and CTL-E to merge them all together. Now duplicate that layer and CTL-T to transform them and rotate them to create a grid like this:

Next step, we are going to us the Elliptical Marquee Tool (M) to create a circle selection like the one in the image below.
Ok, moving right along. Click Filter>Distort>Sphere. Use 100% for the Amount and Normal for the Mode. You should have something like this:
Cut the selection and paste it in order to get the front of your globe.
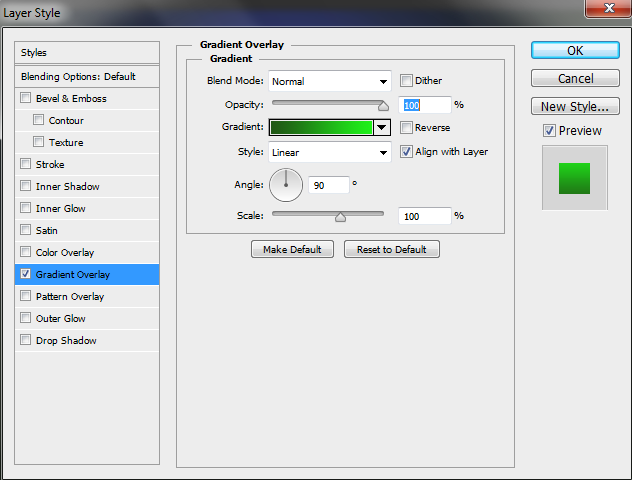
Click Layer>Layer Styles>Gradient Overlay. Apply a gradient from dark green (#205715, is what I used you can use whatever color fits your fancy) to light green(#1ef11a, my choice) in a linear mode (if you can't tell I like the color 'Green'). Just copy down all the different options if I don't put them in this tutorial.
Now you should have something like this image:
Then go ahead a duplicate that layer (CTL-J) and rotate it about 45 degrees. You are going to have to change the gradient colors to light green on top and then the dark green on the bottom. So far you have what appears to be a nice 3D effect.
Then putting them together you should start having a nice 3D Globe Effect.
Now, we have to give the background some color so let's use a nice blue color. Select the background layer and click on Layer>Layer Styles>Gradient Overlay. I used the colors (#0c1807) and (#3c52f4). Radial for the style and 140% for the Scale. Angle at 90 degrees. Position the center of the gradient a little bit on the top of the center of your globe. To do that just click and hold to move the gradient position while you are in the Gradient Overlay property.
It come out nicely and should have something like this if you are following my color scheme.
Select the front of your 3D Globe and edit the layer styles. Double click then click on Inner Shadow and I am going to use (#2afe00), change the Blend Mode to Color Dodge for the Blend Mode of 60% Opacity. Angle -104 degrees uncheck Use Global Light. Distance at 3px amd Sizeat 7px.
After your editing abilities of the Layer Style you should have something like this.
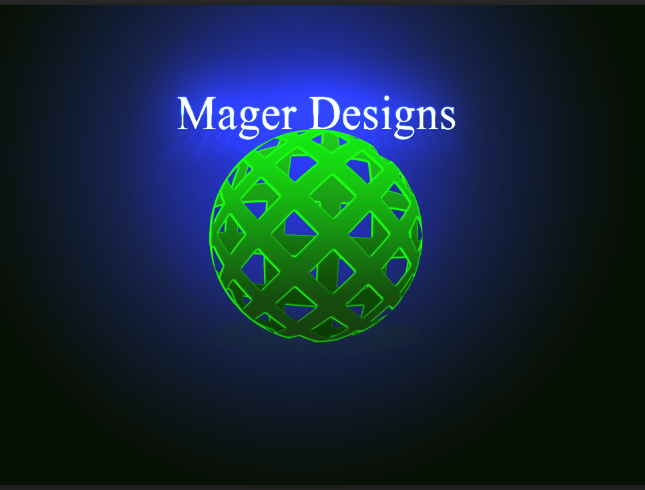
Now, you should be very proud of yourself you finished your 3D Globe Photoshop Graphic. Here is the finished product.


No comments:
Post a Comment